

Are you having trouble connecting to the internet? Are you getting the “Internet May Not Be Available” error on your Android phone? If you are, then stick around to learn how to resolve this issue.
Nowadays, internet has become a necessity instead of a luxury. Even most of our everyday work requires a stable internet connection. So, it can be very frustrating when you suddenly start receiving an error message while trying to connect to the internet.
So, in the following guide, we will discuss the possible causes behind the “Internet May Not Be Available” issue, along with a few fixes to fix the problem.
Why Does My Wi-Fi Say Internet May Not Be Available?
Before moving on to the solutions, it is a good idea to know what might be causing the “Internet May Not Be Available” issue on Android phones. We have compiled a list of the most possible causes based on multiple user reports. Let’s take a look.
DHCP is a network mode used by Android smartphones to detect certain networks and settings. It works automatically. However, if there’s an issue with the DHCP, your smartphone will struggle to automatically connect to the internet.
DNS, also known as Domain Name Server settings, is responsible for connecting your browser to a specified URL. This is a crucial step in establishing a connection. However, if the DNS server is blocked by the website, you won’t be able to connect.
It is important to keep your Android OS up to date as an outdated system can cause a lot of issues. There are cases where users were unable to connect to the internet but after updating their phones, the problem went away. So, on rare occasions, outdated OS can stop you from connecting to the internet.
The possibility of another application causing interference with the performance and functionality is always high. And due to the conflict, this error may have been triggered.
When you’re facing problems with your internet connection, you may need to check your Wi-Fi Router.
It is the device that helps you to connect to the internet. Certain IP addresses and DNS settings changes can easily block your connection. Take a look, you may need to make a few changes.
1. Restart Android Phone and Wi-Fi Router
Having trouble connecting to the internet via your Android smartphone, give it a quick restart.
No matter what you think, restarting an electronic device is a legitimate fix to many issues. It can get rid of bugs and minor performance issues.
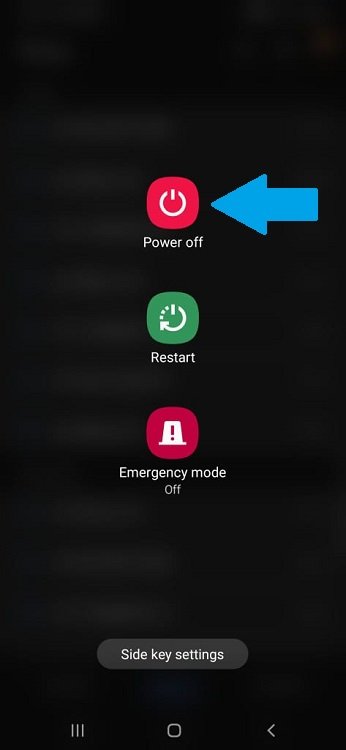
So, hold the Power button, wait for the Power Menu to appear, and tap on that Restart option.

If the error message is appearing when you are trying to connect to the internet via Wi-Fi only, then we recommend restarting the Wi-Fi router as well.
There are no specific steps for restarting a router, just turn off the power switch and then turn it on again after a few seconds.
2. Switch Between Mobile Data & Wi-Fi
If you still haven’t managed to connect to the internet, then switch between Mobile Data and Wi-Fi. This will help you to at least, identify the problem.
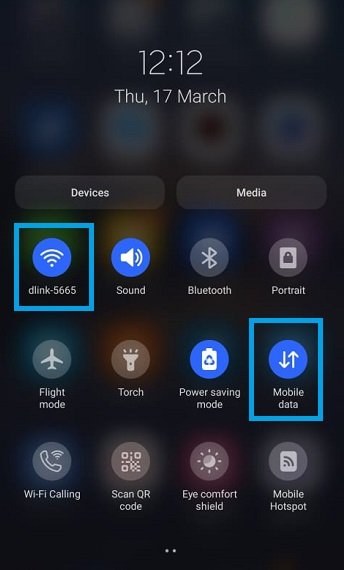
So, simply swipe down to access the Android Quick Settings Panel. From here, you can disable or enable both Wi-Fi Network and Mobile Data. If you are facing the issue while on mobile data, switch to Wi-Fi and vice-versa.
3. Check Date/Time on Android
If your Android smartphone has an incorrect date and time, it can cause a lot of issues. It can effectively stop you from connecting to the internet.
This is actually a security issue as checking the date and time is part of the verification process. If the program can’t verify the connection, you will not be getting past it.
So, check the date and time set on your mobile. If not correct, you need to fix it.
- Launch the Settings app. Then, scroll down and tap on the General Management option.

- Now, tap on Date and Time.

- Then toggle the switch beside the Automatic Date and Time option to enable it.

Now, the date and time on the Android mobile will be synced according to the Time Zone you currently live. Now, try to connect to the internet. If the problem is still there, move on to the next solution.
4. Forget Wi-Fi Network and Re-Connect
If the issue appears when you are connecting to the Wi-Fi network but your internet connection and router are working just fine. Then, you need to narrow your focus to the Wi-Fi settings on your mobile.
The best idea would be to make your Android phone forget the saved network and then reintroduce it as a new one.
Keep in mind, forgetting a network means, all the stored information will also be deleted like the password required to access the network. So, before forgetting the network, make sure you have the necessary login credentials.
- Launch the Settings app and tap on Connections.

- Then, select Wi-Fi and tap on the Gear icon beside the desired Wi-Fi network.

- Lastly, tap on the Forget option below.

After making your Android device forget the saved connection, you need to reconnect. So, reboot the device and then locate the network and connect. Provide the Wi-Fi password in order to connect to the internet.
5. Modify the DHCP Mode
As we have discussed earlier, the DHCP mode plays an important role in this spectrum. It helps to configure the setting to a suitable one so that you don’t have any trouble while connecting to the Wi-Fi.
If this configuration is somehow messed up, you will face problems and you’ll have to change it manually.
- Launch the Android Settings app and tap on Connections.
- Under Connections, tap on Wi-Fi.
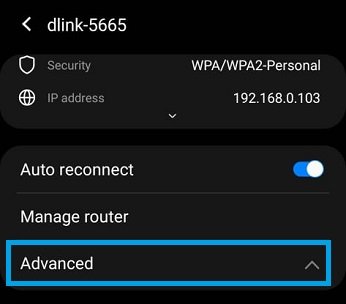
- Now, tap on the Gear Shaped icon beside the saved Wi-Fi network.
- In the new panel, open the Advanced menu.
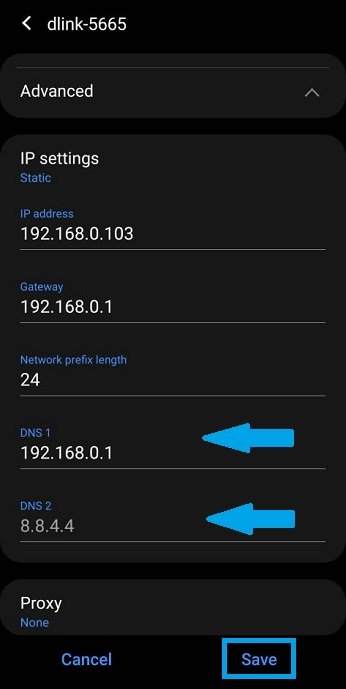
- Tap on IP Settings and change it to Static from DHCP.

- In the new menu, enter 8.8.8.8 under DNS 1 and 8.8.4.4 under DNS 2.
- Lastly, tap on the Save button below to proceed.
Now, try to connect the Android device to the Wi-Fi. It should be able to do it and no error message should appear.
6. Update the Android System
It’s good practice to always keep your mobile’s firmware updated as an outdated Android OS can be buggy and create lots of issues.
So, if you haven’t updated Android in a while, maybe the buggy system is causing the internet issue. It’s time to install the latest Android update.
- Launch the Settings app and tap on Software Update.
- Now, tap on the Download and Install option.

A search will be initiated immediately for the new OS update. If an update is available, select Download and Update and follow the onscreen prompts to download and install it. After the update is installed, the problem should disappear and you can connect to the internet again.
7. Reset Android Network Settings
If none of the previous methods have worked and you are still getting the “internet may not be available” error on your mobile, you may need to reset the Android network settings.
It is an effective way to fix network-related issues. It clears up all the customization and reconfigures the network settings.
- Launch the Settings app on Android and tap on the General Management option.
- Tap Reset in the following panel and then, select Reset Network Settings.

Afterward, follow the on-screen instructions to complete the network reset. Hopefully, you will be able to connect to the internet after the reset.
8. Enable Android Safe Mode
If you’ve reset the network settings and you are still getting the “Internet May Not Be Available” error on Android, you need to put your phone in Safe Mode.
As we have discussed earlier, one of the reasons for this problem is faulty 3rd party applications. In order to confirm, you’ll need to put your Android phone in Safe Mode where only the system apps would be running.
So, if you can connect to the internet while in Safe Mode or the error message just stops popping up in Safe Mode, you can be sure that an application is causing this and you need to remove it.
Surely, you have installed a new application recently from an unknown developer. Try to remember, which one and enter Safe Mode.
- Press and hold the Power button and wait for the Power Menu to appear.
- In the Power Menu, tap and hold the Power option. These steps are based on Samsung Galaxy mobile. If you are using a different Android phone, you may have to hold the Restart option.
- After holding the option for a few seconds, Safe Mode option would appear. Tap on it and enter Android Safe Mode.

If you are able to connect to the internet in safe mode, then the most recent applications on your smartphone need to be uninstalled.
9. Wipe Cache Partition
Wiping the cache partition can be effective when you face an internet connection with your phone. But this requires you to enter the Android Recovery Mode.
Regular Android users aren’t aware of the function of the Recovery Mode. So, we only recommend this method when the rest of the solutions have failed to fix the issue.
The steps to enter Recovery Mode will vary from device to device. Just remember, the following steps are based on a Samsung Galaxy device.
- Connect your Android mobile to the charging cable and connect the other end of the cable to a laptop or a computer.
- After that, turn off the device.
- Then, hold the Power and the Volume Up buttons for a few seconds. The device will enter Recovery Mode.
- In the Recovery Mode, use the volume buttons to choose the Wipe Cache Partition option.
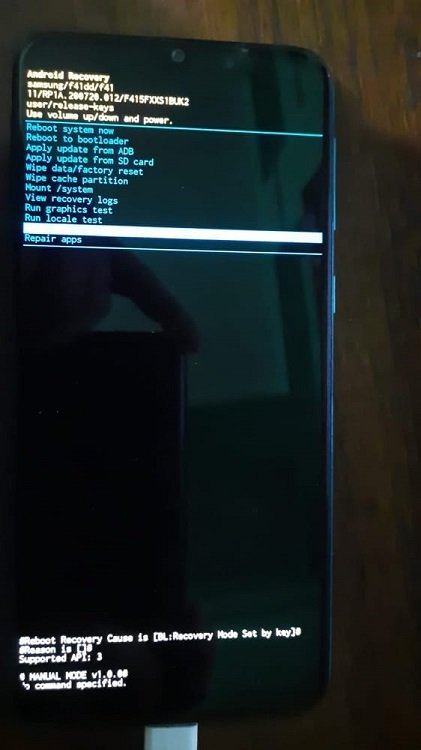
- Then, tap on the Power Button to execute.
After wiping the cache partition, select the Reboot option and tap the Power button to execute. After the device is rebooted, try to connect the device to the Wi-Fi.
10. Factory Reset Android
If nothing works, then your last hope for salvation is Android Factory Reset. Now, you can factory reset your Android mobile from the Recovery Mode as detailed in the previous solutions.
Instead of selecting wipe cache partition, choose factory reset and then, tap on the Power button for execution.
Now, if you don’t want to go through the trouble to enter the Recovery Mode again, don’t worry you can execute Factory Reset from the settings as well.
But factory resetting the Android device will erase all the stored data. So, if there is anything important on your mobile, do not forget to back up your Android phone.
- Launch the Settings app on Android and tap on the General Management option.
- Tap Reset in the following panel and then, choose Factory Data Reset.
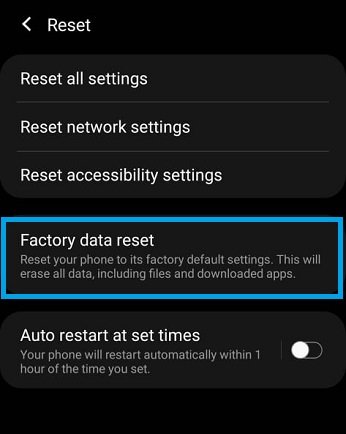
- Now, you will come across a new panel with information. Scroll down and tap on the Blue Reset button.

After tapping on the Reset button, there will be a final verification. You will be asked to provide the password/pattern/fingerprint. Then, the device will reset.
Wrapping It Up
We hope the tips in this guide have been useful in helping you fix the “Internet May Not Be Available” error message on your Android.
The solutions we have discussed in the article are all verified but if you know of any other fixes for this Android issue, let us know via the comment section below.